First World War Project
Wilfred Henry CARYER (of Doddington)
b. Q1, 1897 Private, Service Number G/768 |
The Commonwealth War Graves Commission (CWGC) records - Son of Henry Ralph and Mary Caryer, of Yew Tree Cottage, Doddington, Sittingbourne, Kent.
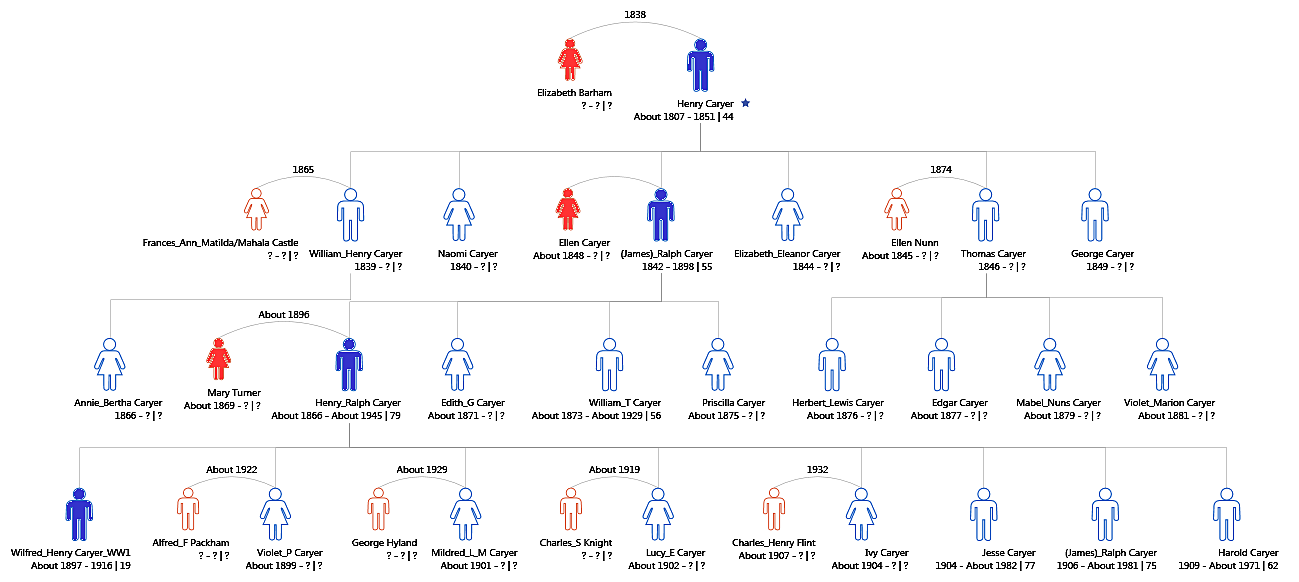
Wilfred's father, Henry (also "Harry") Ralph and Mary (née Turner) married in 1896 and set up their family home in Yew Tree Cottages that still sit at the west end of The Street in Doddington. Henry started working life following his father as a groom/coachman but then turned to agricultural labouring to support his family. In 1911, Wilfred was the eldest one of eight surviving children (one died in infancy) - in age order, his siblings were Violet P. (married Alfred Packham, 1922), Mildred L.M. (married George Hyland, 1929), Lucy E. (married Charles Knight, 1919), Ivy (married Charles Henry Flint, 1932), Jesse, James Ralph (sometimes known simply as "Ralph"), and Harold. The extended Caryer family originated first in Milsted and then became established in Doddington.
The 1911 census shows Wilfred was one of four patients lying in the Fever Ward of the Isolation Hospital on Beacon Hill, Buckland (it may be that the hospital occupied what is today called "Beacon House", which lies to the north of the A2 London Road, close to the junction with Four Oaks Road, Buckland). This isolation hospital employed a matron, three nurses, a laundress, cook, housemaid and wardmaid and they looked after Typhoid and Small Pox cases. We don't know why Wilfred was there. It might tentatively be speculate "typhoid" as his medical records show no distinguishing marks - like pock-marks? This location works well with our documented association of Dr Selby of Greenstreet Hill who mentions an "isolation hospital nearby" when discussing alternatives to the Jubilee Pump on Greenstreet Hill. Doug Stubbings's reminiscences also mention the hospital in the 1930s.
| Faversham and North East Kent News of 13th May 1916 |
| DODDINGTON MAN KILLED IN ACTION. Private Wilfred Caryer, of the 6th Battalion the Buffs, son of Mr. Henry Caryer, of Doddington, was killed in action on March 6th. He enlisted in September, 1914, with two other Doddington men, namely, Percy Forster (d. 13th October) and Harry Higgins (d. 13th October), both of whom have been missing since October 15th, 1915, when the 6th Buffs lost rather heavily. Private Caryer had not previously been wounded. He was 19 years of age last January and had been at the Front about a year. |
Military Records
Wilfred's Service Number (G/768) places him amongst the very first groups of recruits to Kitchener's New Army following the outbreak of war. He did so by lying about his age - a fairly common practice in those early months.
On 1st September 1914, in order to serve overseas, he declared his age as 19 years and 6 months; he was actually only 17 years old; Wilfred died just after turning 19 years old.
On 4th September, having passed his medical at Faversham, Wilfred was posted to 6th (Service) Battalion of the East Kent (The Buffs) Regiment stationed at Canterbury. From Canterbury, the 6th (Service) Battalion moved to Colchester and Purfleet to join the 37th Brigade of the 12th Division and afterwards moved to Shornecliff
In February 1915, Wilfred's Battalion moved to Aldershot before being mobilised for war and arriving at Boulogne on 1st June 1915 to join the British Expeditionary Force (BEF). He saw active service in France for 280 days before being killed in a particularly costly action.
Circumstances of the Death of Private Wilfred Henry Caryer
On 3rd June, 6/The Buffs arrived at WIZERNES to join the 37th Infantry Division. They mustered 29 officers and 989 other ranks. From there, the 37th Infantry Division marched to their billets in ARMENTIERS on 20th June. 6/The Buffs' first experience of the trenches came at PLOEGSTEERT when they relieved 7th Warwickshire Regiment. This cycle of relief and being relieved continued throughout July, with periods of trench-digging under the supervision of 87th Field Company. On 16th June, 6/The Buffs saw their first German mining operation opposite their trenches (ARMENTIERS). They later found themselves in trenches facing a crater of 30 feet diameter and 20 feet deep.
This pattern continued through August, in and out of trenches and the Divisional Reserve at OOSTHOVE.
It wasn't until 1st September 1915 that 6/The Buffs suffered their first deaths when the Regimental Diary records "the enemy seem to have got the range of our Support Fire Trench and blew up one dugout containing 3 men of the Buffs." On 28th September, the 37th Infantry Division troops were entrained at STEENWERK STATION (transport to move by road). Detraining at FOUQUEREUIL near BETHUNE. From here, 6/The Buffs Marched to Vermelles via NOEUX LES MINES and MAZINGARBE straight into trenches.
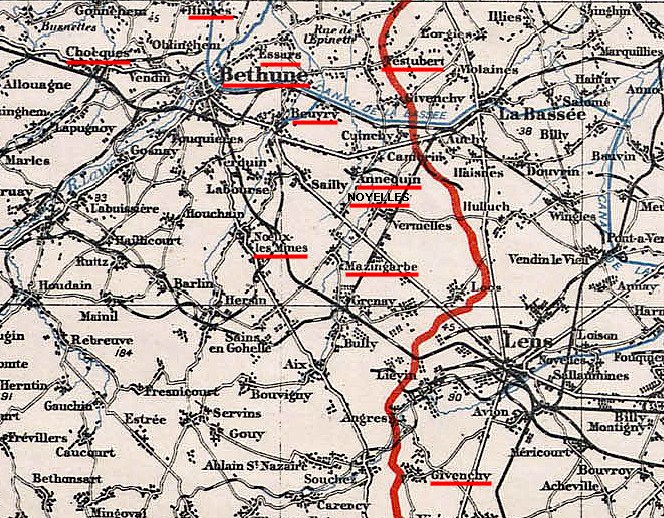
This sector was then 'home' to the 6th Battalion, The Buffs, as they cycled through reserve and relieving exercises into 1916, which is where we pick up Wilfred's story again. This map highlights the scope of the 37th Infantry Division and the location where The Buffs were active or in reserve. [Note: NOYELLES has been added to the map as this was where the final action took place for Wilfred Caryer]
There were occasional and sporadic losses and wounded as 6/The Buffs passed into and out of the trenches until March.
March 1916
1st March: Brigade in Divisional Reserve at Bethune.
2nd March: Brigadier inspected troops. Nothing to report
3rd March: Working party of 200 men, East Surrey Regiment, were sent up in busses at 5pm to assist 36th Brigade consolidate the trench and craters occupied on night 2nd/3rd.
4th March: Brigadier and Brigade Major attended conference at Divisional H.Q. Orders received to relieve 36th Infantry Brigade on 5th. 6th Buffs and 7th E. Surrey Regiment marched at 12am to ANNEQUIN and SAILLY-LABOURSE. 6.45pm Operation Order No.60 issued cancelling Operational Order No.59.
5th March: In accordance with O.O.60, Brigade relieved 36th Infantry Brigade in the trenches. There was a certain amount of hostile shelling during the relief causing some casualties to the East Surreys. Relief was reported complete at K.3 W.40.
Disposition - Right battalion - 6th Buffs; Left Battalion - 7th East Surrey Regiment; Support - 6th Royal West Kent Regiment; Reserve - 6th Queens. Battalion on right - 35th; Brigade on left - 98th.
6th March
The two Operational Orders differed significantly, too late in the day to undertake reconnaissance, with tragic consequences for Wilfred.
- Instead of relieving the 35th Infantry Brigade in "C" Sector of the line, the 37th Brigade relieved the 30th Infantry Brigade immediately to the left of the 35th Infantry Brigade.
- The troops set out along the BEUVRY-ANNEQUIN Road by Companies 300 yards apart and then East of NOYELLES by Companies 200 yards apart. From there 6/The Buffs passed between RIFLEMAN'S ALLEY and DARTS ALLEY.
- O.O.60 differed also in specifying that "every man will carry 220 rounds Small Arms Ammunition (SAA) into the trenches." This was not a good sign as it meant either that the sector they were in was under significant regular attack or that an offensive action was imminent!
- Two Companies of the 6th Connaught Rangers were also attached to 6/The Buffs in the forward trenches - reinforcement of this kind also suggested a plan for an offensive action (even if the details were changed at the 11th hour). The story of Wilfred's last day is laid out in some detail by documents from the H.Q. diary, Official Orders and Report covering the main action in which 6/The Buffs were involved. Those documents can be found at the bottom of this story.
In short, 6/The Buffs were given orders to take possession of the "TRIANGLE CRATER", adjoining trenches and smaller craters in no-man's land and to hold them 'at any cost'. The strategic reason for the action was to respond to the advantage given to the German forces who occupied the raised lip of the larger "TRIANGLE CRATER". So, mining actions that were intended to kill and disrupt the enemy would often created problems of their own in terms of tactical advantage between opposing trench systems.
At 6pm on 6th March, the combined 6/Buffs (Company "C" + 2 platoons of Company "D") and Connaught Rangers moved in four parties over the trench parapet and progressed until one group got mired up to their knees in mud that stopped them in their tracks - those trapped men were mostly wiped out by machine gun fire and grenades. The men in other parties experienced similar difficulties and broken supply lines, leading to confusion followed swiftly by a sustained counter-attack by German forces. 6/The Buffs suffered intense machine gun, mortar, grenade and small-arms fire.
From these accounts, we may assume Wilfred Caryer was a member of "C" or "D" Company. His records don't help us in this regard. We have transcribed the whole of the supporting documentation including the crater map - below. These documents demonstrate how planning was often superficial and frustrated by actual conditions found by fighting soldiers trying their best to deliver the plans on the ground.
37th Infantry Division Diary entry for March 6th glosses over the story by pointing to Operation Orders and Reports. The Diary reads:
"4.30 am: We exploded a mine at midnight just South of Sap 6 close to German front line to blow in hostile gallery, no attempt made to occupy crater by either side. Hostile trench mortars and artillery fire did some damage to STICKY TRENCH, NORTHAMPTON TRENCH & VIGO STREET.
5.10 am: Enemy blew a small mine near Sap 2. No damage done. Neither side occupied crater.
9 am: Enemy put up another mine close to Sap 6 about 21 yards from our parapet, no damage done but Saps 5 and 6 partly filled. Saps being cleared to lip of crater.
4 pm: Another hostile mine exploded in front of ALEXANDER TRENCH near Sap 6 preceded by heavy bombardment. Slight damage to one trench and about 16 casualties from shock.
6 pm: 6th Buffs attacked TRIANGLE CRATER in accordance with O.O. No. 61. Separate Report of operations is attached [Appendix D].
Casualties to 12 midnight 6th: Killed 29, Missing 18 Wounded 215 (including 16 shock from mine)"
6/The Buffs Diary stated (with almost venomous criticism for failures in planning and preparation):
"6 pm: Attacked TRIANGLE CRATER & CHORD started by "C" Company went in 3 parties. Lieut Cumberbatch with his platoon on the right were hung up by sticky ground and were caught by enemy's bombs; he himself slightly wounded and all of his men casualties. 2/Lieut Butler and his platoon succeeded in reaching CHORD and maintained their position until most of the craters were casualties and the supply of bombs failed owing to a heavy counter-attack by the enemy which took the long chain in the flank. 2/Lieut Smeltyn and this platoon managed to reach the junction of the CHORD and TRIANGLE CRATER, but finding themselves without supports and running out of bombs had to withdraw. The remainder of the Company under Captain WARD advanced into the TRIANGLE CRATER to join up with 2/Lieut Smeltyn but were held up by very heavy bombing and could not proceed. The failure of the attack was due
(1) To the preparedness of the enemy.
(2) The muddy condition of the ground, which rendered the right party's advance impossible.
(3) The short notice given, rendering it impossible to reconnoitre or work out details thoroughly.
(4) The fact that the Battalion holding the line and holding it weakly, could not follow up the first attack with reinforcements.As regards (1) it is fairly certain that the enemy intended to make his usual nightly attack and was forestalled by us; he actually attacked the East Surreys on the left in CRATER "C" shortly after this. 6.30pm: Enemy attitude very threatening garrisons of CRATERS kept busy bombing especially of CRATER No.1 where their casualties were heavy. At one time this CRATER was held by 2/Lieut Lea SMITH and one Lewis gunner only and supply of bombs running low. Supports and bombs sent up for Royal West Kents. 9pm: Situation developed into an artillery duel, which quieted down by about 2am our casualties were about 80 (mostly from bombs and consequently not serious) including 6 officers - 2/Lieut Redshaw killed, 2/Lieuts Durling and Butler wounded, Lieut Cumberbatch and 2/Lieuts Smeltyn and Lea Smith, Corporal Cotter (see below), Corporal Newman (both of "C" Company) and Private Bradley of the Lewis Gun Section were recommended for Immediate Reward for the part they took in this Action."
The 6th Battalion, The Buffs, Diary clearly lays out the reasons why the attack failed. Soon after, "Triangle Crater" was mined by British Forces. The map starkly illustrates just how close men on both sides were.
Addendum: A human story and a Victoria Cross for Corporal William Reginald Cotter
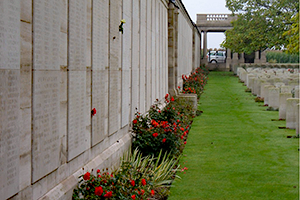
The extremity of the situation facing 6/The Buffs can be glimpsed in the extraordinary and heroic feats that earned (Acting) Corporal William Reginald Cotter [L/6707], aged 34, the Victoria Cross. The V.C. was awarded posthumously, as he succumbed to his profound wounds eight days later on 14th March 1916. He first arrived in France on 7th September 1914, so was already an experienced soldier (initially a Private in 1st Battalion The Buffs).
"In the attack made by 6th Battalion The Buffs, along the Northern Trench of TRIANGLE CRATER, on the night of 6th March, the party led by Corporal Cotter was cut off owing to casualties in the centre. He returned under heavy bomb fire, reported the matter and then took back bombs to his party, so enabling them to fight their way back to No.2 CRATER.
While directing this latter operation his right leg was blown off close below the knee and he was also wounded in both arms.
He made his way unaided along 50 yards of trench in order to reach No.2 CRATER.
While doing so he came upon a junior N.C.O. (Lance Corporal NEWMAN) who with his section was bombing towards the right. Corporal Cotter appreciating where help was most needed directed him to bomb towards the left.
He reached No.2 CRATER and by this time the Germans had developed a violent and rapid counter-attack.
Matters become somewhat disorganized as the garrison of the Crater was throwing bombs and firing wildly, whilst they were suffering heavy casualties from the enemy's bombs.
Corporal Cotter then from a position on the side of the Crater, although suffering great pain, steadied the men, issued orders, controlled their fire and then altered their dispositions to meet the attack on his side of the Crater. He also directed and controlled the supply of bombs and S.A.A. [Small Arms Ammunition].
He remained in this position for about two hours and only after the attack had been repelled and matters had quietened down a little would he permit his wounds to be roughly dressed.
It was not possible to evacuate him until 14 hours later and during this time he had a cheery word for all who passed by the entrance of the "dug out" where he was placed.
Undoubtedly the fine example he showed to all by his endurance under suffering, coolness under fire, and keen sense of duty, helped really to save what might have become a very critical situation.
During the time he has been with the 6th Battalion The Buffs he has always proved himself a fine soldier. In the trenches his activities lay chiefly in Sniping and Scouting, and in this connection he has rendered very valuable service.
He was always ready to volunteer for such work as patrols, wiring etc., and never considered a task too dangerous or disagreeable for him.Signed R.O.C. WARD, Captain, 6th Battalion The Buffs.
Record of Effects for Wilfred Caryer
Wilfred named his mother, Mary, as his sole legatee. So she received his effects that initially included £10 7s. 7d; supplemented later with a War Gratuity of £6. 10s.
Walter was posthumously awarded the 1915 Star, the British War and Victory Medals - See Appendix 1.
Extended Family (draft)
SUPPLEMENTARY TRANSCRIBED MILITARY DOCUMENTS
(a) 37th Infantry Brigade Orders, Reports, and Crater Map Appendix B - Operation Order No.60 (Replacing initial O.O.59)
37TH INFANTRY BRIGADE ORDER NO.60 – Copy No. 16
Reference BETHUNE Combined Sheet 1/40,000 & Trench Map
4th March 1916
1. Operation Order No. 59 is cancelled.
2. The Brigade will relieve the 30th Infantry Brigade tomorrow in "D" Sector is accordance with the attached March Table.
3. All trench stores and steel helmets will be taken over and duplicate receipts forwarded to Brigade H.Q. by 9 a.m. 6th inst.
4. All movement along the BEUVRY-ANNEQUIN Road will be by Companies at 300 yards interval. All movement East of NOYELLES will be by platoons at 200 yards interval.
5. The KEEPS will be taken over under arrangements to be made by the 36th Infantry Brigade. Relief will be complete by 9a.m.
6. Every man will carry 220 rounds S.A.A. into the trenches.
7. Two companies 6th Connaught Rangers will be attached to the 6th Buffs and will hold positions in the front line on the right of the Battalion.
8. Two companies 6th Buffs and will hold positions in the front line on the right of the Battalion.
9. Special attention must be paid to all bombing posts.
10. Battalions will take over transport lines from the Battalions of the 58th Infantry Brigade which they relieve.
11. Completion of relief by companies to be reported to Brigade H.Q.
[Signed] Captain, Brigade Major, 37th Infantry Brigade.
Appendix C - Operation Order No.61
37TH INFANTRY BRIGADE ORDER NO.61 – Copy No. 13
Reference CRATER MAP.
5th March 1916
1. The enemy are in possession of the further lip of TRIANGLE CRATER and the adjacent trenches THE CHORD and BIG WILLIE.
2. The 6th Buffs will capture the crater, consolidating on the line THE CHORD – BIG WILLIE 50 yards S.E. of its junction with the German trench running to the South of TRIANGLE CRATER. The Attack will be organised in three parties and will commence at 6pm, 6th inst.
(a) No. 1 Party consisting of 1 Platoon starting from "A" Crater will block C1 and gain possession of the CHORD as far as the junction of the communication trench running into it along the Northern Edge of the Crater.
(b) No. 2 Party consisting of 1 Platoon starting from No.2 Crater and attacking along the Northern face of TRIANGLE CRATER, will seize and consolidate the CHORD an double block Communication Trench C gaining touch with No.1 Party at junction of the CHORD and Communication Trench running North of TRIANGLE CRATER and No. 3 Party at junction of BIG WILLIE and the CHORD.
(c) No. 3 Party consisting of a platoon, starting from No. 2 Crater, will attack along the Southern face of the Crater and block BIG WILLIE, South of the hostile mine shaft and clearing the Eastern Lip of TRIANGLE CRATER which they will proceed to at once consolidate.
(d) No. 1 and 2 Parties will only use bombers to clear and block Communication Trenches C and C1 the remainder of the position being rushed with fixed bayonets.
(e) No. 3 Party will be preceded by bombers who may be utilised to clear Eastern Edge of TRIANGLE CRATER and to block BIG WILLIE.
(f) Rifle Grenade posts will be established in Craters "A" and No. 2 to give overhead covering fire on BIG WILLIE and Communications Trenches C and C1
(g) The following depots will be established
In CRATER "A" 2000 Hand Grenades
100 Rifle Grenades
6 boxes S.A.A.
In CRATER B 3000 Hand Grenades
150 Rifle Grenades
10 Boxes S.A.A.
(h) Each man in the attack will carry 220 rounds S.A.A. and 6 sandbags. A proportion of men in each party will carry a pick and shovel.
(i) If time permits BIG WILLIE and the Communication Trenches C & C1 will be wired in between the blocks, special parties being detailed for this duty.
WIRE CUTTERS. A proportion of Wire Cutters are to be carried with each party.
(j) (The Officer Commanding 69th Field Company will detail 6 sappers to go with each party).
(k) The Officer Commanding 6th Buffs will arrange for 2 LEWIS GUNS to be so placed in position in Crater "A" that they can sweep down BIG WILLIE and C1 in the event of a hostile counter-attack.
(l) The Officer Commanding 173rd Company, Royal Engineers, will detail a party under an officer or reliable N.C.O. to accompany No. 3 party and point out the mine shaft in BIG WILLIE.
3. [STRUCK OUT]
4. TRENCH MORTARS. Trench Mortar Batteries will keep up heavy fire on the German CRATER 100 yards South East of TRIANGLE CRATER, commencing simultaneously with the attack.
5. ARTILLERY CO-OPERATION. At 6.10 pm the LEFT GROUP will form a barrage of fire from GERMAN CRATER 100 yards South East of CRATER "A" along CROSS TRENCH and trench joining CROSS TRENCH with the above mentioned GERMAN CRATER.
Signed 'K. Trevor' Captain, Brigade Major, 37th Infantry Brigade.
HANDWRITTEN COPY - IMPLEMENTATION OF ORDERS
"6th Battalion The Buffs Under No1 E.P.34
6th March 1916
1. The 6th Buffs have been ordered to take the triangle crater and hold it at all costs, and CHORD & BIG WILLIE minehead.
2. "C" Company will carry out the attack under Capt WARD.
"D" Company has 2 platoons will act as reserve and form chain for supply of Bombs etc under MAJOR WEDD reinforcing if required, with bombing groups ready formed in reserve. A party of Royal Engineers will accompany "C" Company reporting to Capt WARD.
3. "A" Company will furnish a party of bombers with blockers etc to guard the left flank of "C" Company by holding the communication trench on the right.
Lewis Guns. 1 in Crater "A" firing up communication trenches to North. 1 in No2 Crater as a reserve to "C" Company. 1 in No1 Crater and 1 in KAISERIN firing on crater "C".
4. The garrisons of crater will generally assist within their areas but be ready for emergency.
Issued 3pm to Companies C, D, and A.
REPORT ON THE 6/THE BUFFS ACTION
Appendix C
REPORT E.P. 35
To The 37th Brigade
I beg to report that at 6pm, 6th inst., "C" Company went over the parapet with 2 platoons of "D" to act as carriers – 4 Parties were detailed.
No.1 (left) went over "A" Crater with the CHORD as an objective – this was carried.
No.2 advanced from the left of No.2 Crater along the left edge of the triangle crater to the Chord which was just reached.
No.3 advanced on the right of the triangle crater from the left of No.2 Crater and could scarcely move owing to the deep mud.
No.4 advanced from No.2 Crater down the centre on to the triangle crater.
2. The enemy had concentrated about 100 bombers with an unlimited supply of grenades in the deep trenches which intersect the triangle and evidently had made all preparations for launching an attack on a large scale.
3. The Right attack (No.3 Party) got over the parapet and was immediately knee deep in mud and whilst in difficulties were bombarded with grenades and fired at by a machine gun were practically wiped out.
The enemy then took the centre party in flank which was forced back on to No.2 party.
1 and 2 parties maintained a vigorous fight until the chain of supply was cut and after suffering numerous casualties were forced to fall back.
4. The enemy then developed a series of strong bomb attacks on the 3 craters for 3½ hours, with an intense artillery bombardment.
5. It was with difficulty that the supply of bombs and ammunition was maintained and at one time the situation was critical. The attacks were resisted by rifle fire, Lewis Gun and grenades.
6. The chief objective seemed to be Crater A which is the most exposed of the three and surrounded by shell holes.
Signed: Officer Commanding 6th Battalion The Buffs."
TRIANGLE CRATER TRENCH MAP

 World War 1 Pages